
News
How to Take Screenshots on a Windows PC with Keyboard Shortcuts

May
Windows offers several built-in methods that cater to different needs, from capturing a single active window to recording an entire desktop layout for archiving purposes. By mastering these keyboard shortcuts, you ensure a smooth workflow that keeps your digital evidence organized and ready for immediate sharing across collaboration platforms. This guide explores the most effective techniques to help you become an efficient power user in any workspace environment, whether you are working on a stationary desktop or a mobile workstation. Discover the versatility of these native tools today.
🚀 Essential Shortcut Key Takeaways
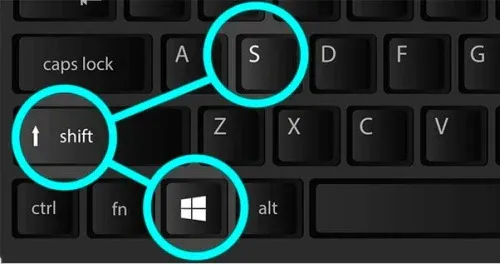
- • Windows + Shift + S: The most versatile tool for custom area selection.
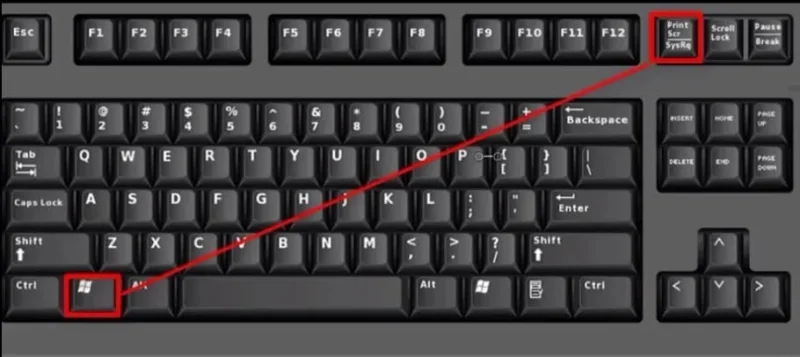
- • Windows + PrtScn: Automatically saves a full-screen image to your folder.
- • Alt + PrtScn: Captures only the active window for focused documentation.
- • PrtScn: Copies the entire screen to your clipboard for instant pasting.
Mastering the screenshot shortcut key windows 11 experience
With the release of newer operating system versions, the experience of capturing your screen has become significantly more integrated and intuitive. The primary screenshot shortcut key windows 11 utilizes the Snipping Tool overlay, which provides a dimmed screen and four distinct capture modes at the top of your display. This allows you to choose between rectangular snips, freeform shapes, specific windows, or a traditional full-screen capture. Once the selection is made, the image is automatically sent to your clipboard and a notification appears for further editing or immediate saving.
The beauty of this modern method lies in its non-destructive nature and its ability to preserve image quality. By using the Snipping Tool, you can also set a delay timer, which is incredibly useful when you need to capture menus that disappear the moment you click away. This technical precision ensures that your visual communication is clear and contextually relevant. Furthermore, the integration with the cloud means that your captures can be synchronized across devices, providing a seamless experience for users who move between different workstations throughout their professional day.
Customizing the Print Screen key behavior
An advanced feature in the latest Windows settings allows you to remap the traditional “PrtScn” button to open the Snipping Tool directly. This simplifies the process by reducing the number of keys you need to press simultaneously. To enable this, navigate to your accessibility settings under the keyboard section. This customization is a favorite among efficiency experts who want to reduce friction in their documentation habits. By standardizing this behavior, you create a unified workflow that saves precious seconds during high-pressure projects or collaborative online sessions.
Pro-Tip for Laptop Users
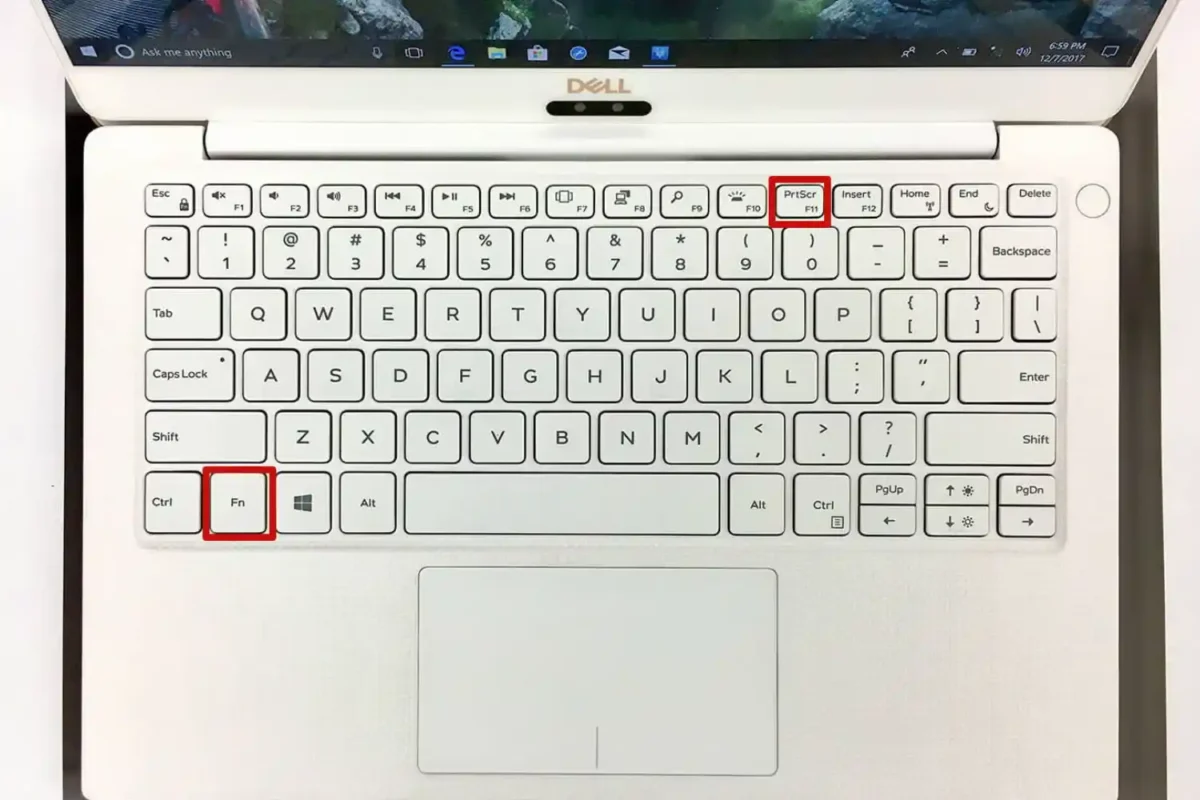
If you are using a compact portable device, the shortcut key for screenshot in laptop might require the use of the “Fn” key. On many models, you must press Fn + Windows + PrtScn to trigger the capture. If your screen does not dim, check if your function lock is engaged or if your keyboard has a secondary function assigned to that specific key.
Efficient methods for the screenshot shortcut key windows 10
For users still operating on the previous major version, the screenshot shortcut key windows 10 remains robust and reliable. While it shares many of the same commands as the successor, the focus is often on the “Snip & Sketch” application. The Windows Key + Shift + S command is still the gold standard here, providing a lightweight way to grab segments of the screen without opening a separate program first. This approach prevents system bloat and keeps your focus on the task at hand, which is vital for maintaining deep work states during complex technical projects.
The clipboard management in this version is particularly helpful. By using the clipboard history feature (Windows Key + V), you can see multiple recent screenshots you have taken. This allows for a “batch” capturing workflow where you grab several pieces of information in quick succession and then paste them one by one into your final document. This level of technical synergy between the capture tool and the system clipboard is what separates average users from those who have mastered their digital tools for maximum output and organizational clarity.
Automatic file generation and storage solutions
Sometimes, copying to a clipboard is not enough; you might need a physical file stored on your hard drive for long-term archiving. Using the how to screenshot shortcut windows combination of Windows Key + PrtScn is the most direct way to achieve this. When you press these keys, the screen briefly dims to confirm the action, and a PNG file is instantly created in your “Pictures > Screenshots” folder. This bypasses the need to open an image editor or manually save each capture, making it the ideal method for creating time-stamped records of your work progress.
✅ Success Signal: Auto-Save Path
Did you know that Windows automatically names these files with a numerical sequence? This makes it incredibly easy to track a series of events or steps in a software tutorial. To find them quickly, just open File Explorer and paste this path into the address bar: %USERPROFILE%\Pictures\Screenshots. This direct access ensures you never lose track of your visual data, even during long sessions.
Capturing active windows for focused documentation
In many professional scenarios, you only need to show a specific application window rather than your entire cluttered desktop. The how to take screenshot on pc with keyboard technique for this is the Alt + PrtScn combination. This command takes a snapshot of whichever window is currently in focus and copies it to your clipboard. This is a subtle but powerful way to maintain privacy, as it hides your taskbar, desktop wallpaper, and other open applications that might contain sensitive information not intended for the recipient of the image.
This method is particularly favored by technical writers and software developers who need to produce clean manuals or bug reports. By focusing solely on the target application, you create a professional look that emphasizes the relevant content. To save this image, you can simply paste it into an email or a messaging app like Microsoft Teams. If you need it as a standalone file, pasting it into the native Paint application allows you to save it in various formats, including JPG or GIF, depending on your specific web optimization or storage requirements for the final project.
Technical comparison of keyboard capture methods
Understanding which tool to use requires a quick comparison of the outcomes each shortcut provides. While they all serve the general purpose of visual capture, the technical destination and the scope of the image vary significantly. Choosing the right method is about matching the tool to the intended use case, whether that is a quick chat message or a formal technical report intended for high-level stakeholders. Efficiency is born from this intentional selection of digital shortcuts in your daily routine.
Troubleshooting common keyboard capture errors
Occasionally, you might find that your preferred how to take screenshot on pc with keyboard method fails to respond as expected. The most common cause for this is a software conflict, where a background application (such as a gaming overlay or a third-party image editor) has “hijacked” the Print Screen key for its own use. Checking your background processes and disabling conflicting hotkeys in your third-party settings is usually the first step to restoring the native functionality of your operating system’s built-in tools.
Another potential issue involves keyboard hardware limitations, especially on older laptops or niche mechanical keyboards that might not have a dedicated “PrtScn” key. In these instances, using the on-screen keyboard or remapping a less-used key via software can provide a workable solution. If you are also an Apple user, you might want to learn about mastering how to screenshot on mac book and laptop effectively to maintain productivity across different hardware ecosystems. Understanding these technical nuances helps you adapt quickly to any device you might encounter in a diverse professional environment.
Utilizing Xbox Game Bar for media capture
For those who need to capture more than just a static image, the how to screenshot shortcut windows suite includes the Xbox Game Bar, accessed via Windows Key + G. While originally designed for gamers, it has become a favorite among media professionals for taking high-quality screenshots and recording video clips of individual applications. This tool is particularly useful because it provides a dedicated gallery where you can manage your captures without leaving the application you are currently using, ensuring a concentrated and efficient capture experience.
The Game Bar also allows for background recording, which is perfect for capturing those unexpected bugs or visual glitches that are hard to replicate on demand. By keeping this tool active, you have a digital “dashcam” for your computer screen, ready to preserve any moment with the press of a button. This depth of functionality highlights the technical sophistication of modern Windows environments, providing users with professional-grade media tools right out of the box, without the need for expensive additional licenses or complex software installations.
⚠️ Common Mistake: Missing the Fn Key
A frequent source of frustration is forgetting that modern keyboards often share the Print Screen key with other functions like brightness or volume. If your shortcut key for screenshot in laptop isn’t working, always verify if you need to hold the Fn key. Without it, your computer might simply be trying to mute your speakers instead of capturing your important visual data.
Advancing toward digital capture mastery
In conclusion, the ability to rapidly and accurately capture your computer screen is a fundamental skill that pays dividends in every digital task. By mastering the how to take screenshot on pc with keyboard techniques discussed in this guide, you move beyond basic usage and into the realm of technical efficiency. Whether you are using the modern Snipping Tool in Windows 11 or the reliable legacy commands of previous versions, the key to success is consistency and intentionality. Take the time to practice these shortcuts until they become second nature, and you will find your digital workflow becoming smoother and more productive than ever before.
Ultimately, your choice of capture method should depend on the final destination of the image and the level of detail required. From quick clipboard copies for instant messages to high-resolution auto-saves for archival records, the Windows ecosystem provides a solution for every professional need. As technology continues to evolve, staying updated with these core commands ensures you remain at the forefront of digital productivity. Embrace the power of these built-in tools and transform the way you share visual information in your professional and personal life today.
✨ Summary of Best Practices
Always remember to check your “Pictures > Screenshots” folder for auto-saved files and utilize the clipboard history to manage multiple captures. For the cleanest documentation, use Alt + PrtScn to isolate the active window. By choosing the right screenshot shortcut key windows 11 or 10, you maintain a high standard of visual communication and ensure that your data is always captured with total technical confidence.